
This is why - so far - we've had the two transformers in parallel streams. If we had them in series in the same stream, then the results of the second custom transformer would overwrite the first results.
After completing this lesson, you’ll be able to:
With our help, a colleague has created a custom transformer that calculates density for a particular area. However, we need to work on it further to make it more generic and to expand its capabilities.
The workspace will handle schema properly because we used "Handle With Published Parameters" for the custom transformer's Attribute References parameter. So, to an extent, we don't have to worry - but there are improvements we can make.
Open the starting workspace in FME Workbench (2025.1 or later).
Notice that there are currently two instances of the custom transformer. Both produce an attribute with the same name (DensityResult). It would be helpful if the user of the custom transformer could define the name of that attribute. Let's set up the transformer to allow that.
This is why - so far - we've had the two transformers in parallel streams. If we had them in series in the same stream, then the results of the second custom transformer would overwrite the first results.
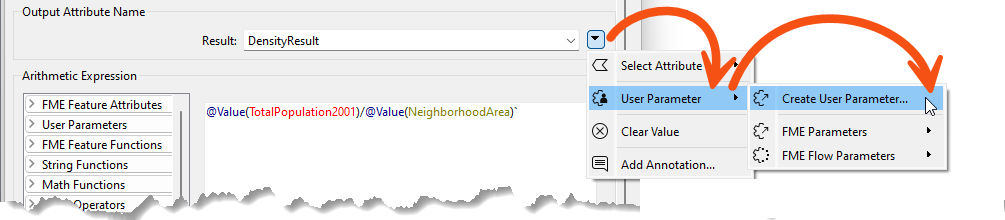
Click the DensityEvaluator tab to switch the canvas to the custom transformer definition. Inspect the parameters for the ExpressionEvaluator. Click the drop-down arrow next to Result (DensityResult) and choose User Parameter > Create User Parameter:
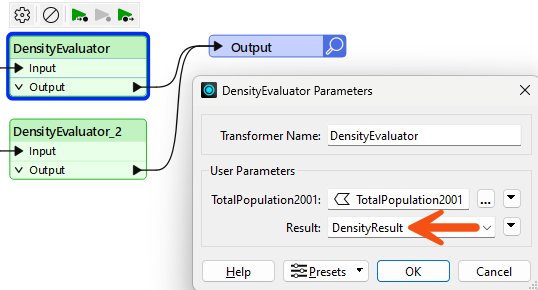
When prompted, click OK to accept the default settings. Return to the Main tab and check the parameters for each DensityEvaluator instance. There should be the option to set the name of the Result:
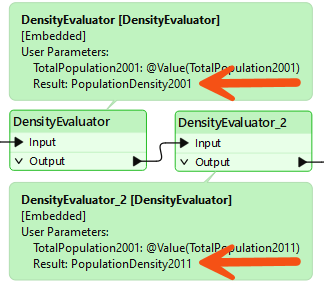
You can now move the instances so they are joined in sequence (rather than parallel) and change the two output attribute names from DensityResult to something more specific for this scenario (PopulationDensity2001 and PopulationDensity2011):
At first glance, it might appear that we've reverted the custom transformer to where we started. To an extent, that's true. However, the point is that we've now got a solution that can work in other scenarios (i.e., where something other than population density is being calculated).
Looking at the custom transformer parameters, we can also see that the prompt for the attribute to analyze is "TotalPopulation2001". This could be more generic.
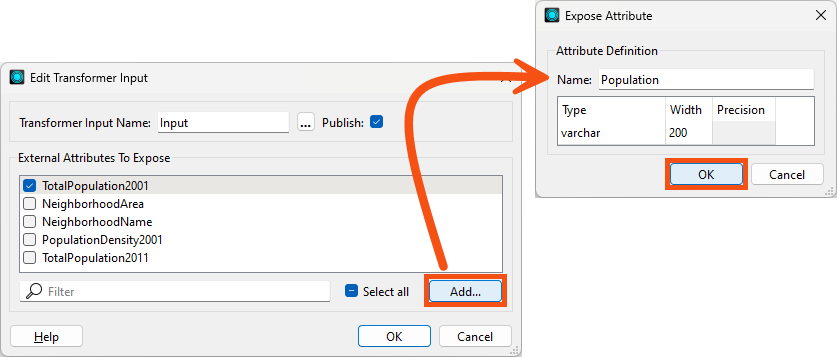
Return to the DensityEvaluator tab and double-click the Input object to open the Edit Transformer Input dialog. We'll add a Population attribute here, prompting the transformer user to choose an attribute to supply the population values.
Click the Add button, then enter "Population" for the Name:
Click OK.
Uncheck TotalPopulation2001 - we'll be using the new Population user parameter instead.
Click OK.
Now we have a new user parameter in the custom transformer, POPULATION. We need to ensure the ExpressionEvaluator uses it. Double-click the ExpressionEvaluator and change the Arithmetic Expression to:
$(POPULATION)/@Value(NeighborhoodArea)
The custom transformer will now use the user's chosen attribute as the population value.
Return to the Main tab. The custom transformers will be invalid because you must supply a Population attribute. Choose TotalPopulation2001 and TotalPopulation2011, respectively.
Run the workspace to verify that the output is still correct.
Currently, this workspace calculates the number of items (in this exercise, persons) per square kilometer of land. This works for the original scenario. However, other uses of this transformer might find different units more useful.
Therefore, we’ll implement a parameter for users to be able to select their units of choice.
In the DensityEvaluator tab, browse the Navigator window and right-click User Parameters. Select the Manage User Parameters option.
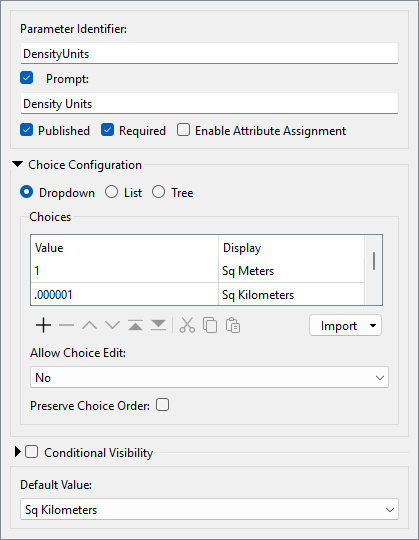
Click the green plus icon to insert a new user parameter. Choose type Choice. Set the following parameters:
| Parameter Identifier | DensityUnits |
| Prompt | Density Units: |
| Published | Checked |
| Required | Checked |
| Enable Attribute Assignment | Not Checked |
| Choice Configuration | Dropdown |
Make two entries into the Choice Configuration table:
| Value | Display Name |
|---|---|
| 1 | Sq Meters |
| 0.000001 | Sq Kilometers |
| Allow Choice Edit | No |
| Default Value | Sq Kilometers |
Your final dialog should look like this:
Then click OK to close this dialog and add the published parameter.
Feel free to add any other units that you want. The units for this coordinate system are in meters, which is why the value is 1. So, other units would need to be a fraction of that; for example, square miles would be 0.0000003861.
When developing custom transformers, it's a good idea to think as generically as possible. This transformer assumes the input data will use meters as a unit. If you wanted to accept data with other units, you'd have to account for that in the transformer and user parameters.
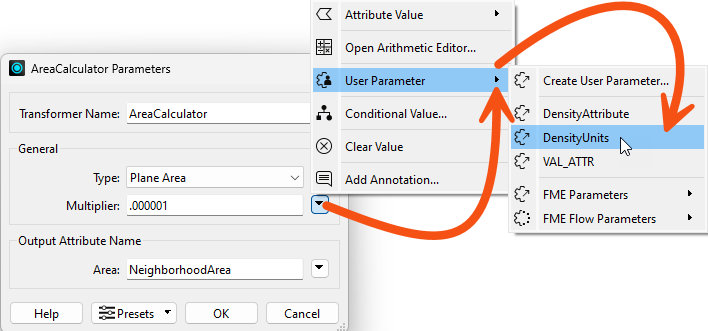
We’ve defined a published parameter so the user can set the units, but we must use it in the custom transformer.
Staying in the DensityEvaluator tab, inspect the parameters for the AreaCalculator transformer. For the Multiplier field, click the drop-down arrow and select the newly defined user parameter, DensityUnits:
Back in the main canvas, the custom transformer now has a parameter for the end user to select the output density units:

Experiment by running the workspace using different units to prove the changes were correctly implemented. Notice that because Enable Attribute Assignment was set to "Off," the end-user cannot use an attribute to set the Density Units.
Although it’s not needed for this population density calculation, another useful function for this transformer would be the ability to weight the density calculations. To set it up, follow the following steps.
The weighting will come from an incoming attribute, which means we need to be able to handle this in the custom transformer’s schema.
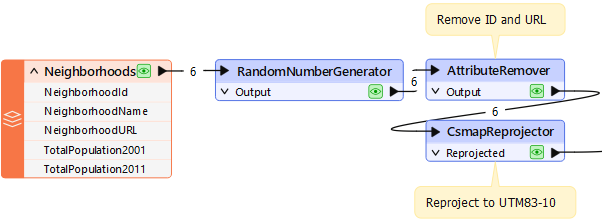
Our source data has no fields we could reasonably use to weigh the output. Therefore, return to the Main canvas tab and add a RandomNumberGenerator transformer to generate a test attribute:
Set the RandomNumberGenerator's parameters to:
| Minimum Value | 0.1 |
| Maximum Value | 1 |
| Decimal Places | 1 |
| Generated Number | WeightedAttribute |
Click OK.
Now we have an attribute we need to expose in the custom transformer in order to use it.
Return to the DensityEvaluator tab, where the transformer is defined. Inspect the parameters for the Input port object. Put a checkmark against the WeightingAttribute attribute:
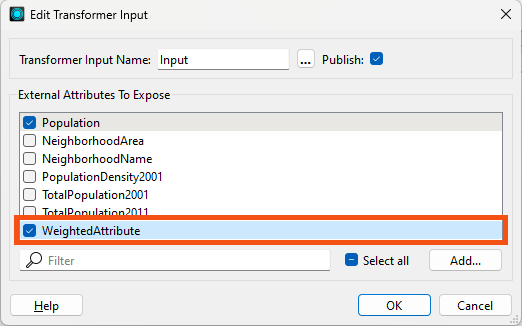
This will cause the attribute to be exposed in the custom transformer definition.
It will also create a user parameter. Locate the parameter in the Navigator window (it should be called WEIGHTEDATTRIBUTE), right-click on it, and choose Manage User Parameters.
For WeightedAttribute, uncheck Required and clear the Default Value field, as this should not be compulsory (the user might not have an attribute to weight the results by):
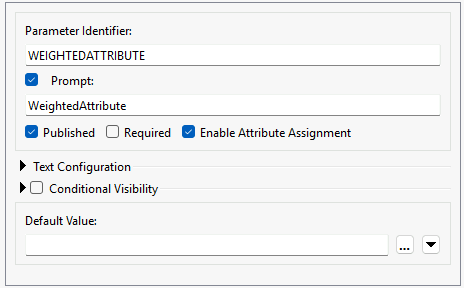
Click OK.
Now, we can use the attribute inside the custom transformer.
Make a copy of the existing ExpressionEvaluator and connect it in parallel to the current one. Then put a Tester in beforehand where the Passed port goes to one ExpressionEvaluator and the Failed port goes to the other:

Inspect the Tester parameters and make a test for WeightedAttribute > 0
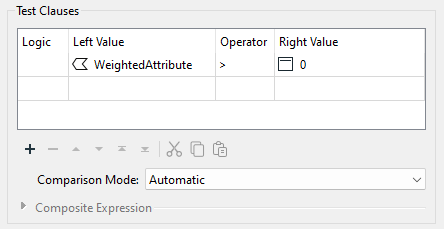
Ensure you select the attribute, not the user parameter. You can tell which is which based on the icon:
Click OK.
Now that the attribute is exposed in the custom transformer, we can use it in the equation to calculate density. Inspect the parameters for the ExpressionEvaluator transformer connected to the Tester's Passed port.
Change the equation to:
($(POPULATION)*@Value(WeightedAttribute))/@Value(NeighborhoodArea)
To clarify, multiply the existing Population attribute by the WeightedAttribute and place parentheses around that part of the expression.
Save the parameter changes and run the workspace (without providing weights) to check the result. It should be unchanged.
Then, change the custom transformer parameters to use WeightedAttribute. Remember – the results will differ every time because we’re generating the weighted attribute randomly at runtime!
Experiment with selecting the weighted attribute in the main canvas and not selecting it. When no attribute is selected, then the features should pass through the Failed port, and no weighting is used in the calculation:

It may seem odd, especially to experienced users, that we use the attribute in the expression instead of the published parameter. But this is all part of how FME handles this behavior automatically. It prevents the author from needing to know about published parameters and how to use them, and it uses hidden functionality to replace the attribute with the published parameter wherever necessary.
